1. Fuse them into a thicker plastic, and make bags and other items out of them. Tons of folks have made some really neat things out of this material. Mostly bags, but I've seen raincoats, bibs and hats too. Top of the google link to etsy's tutorial: right here.
2. Cut them into yarn. This has been going on for ages, long before 2007 when this link was posted. Still, that's a great, easy visual tutorial for ya. Then, pretty much anything you can do with yarn, you can do with plastic bag yarn. (Some folks call it plarn, but that just makes my ears want to bleed a little).
3. Use 'em to pad your fragile gifts in the mail. This especially works with produce bags and the bags that newspapers are delivered in on wet days; gently blow the bag up like a makeshift balloon, tie the end, and put it in with your item. I don't think you need a link for this one really.
4. Use 'em for pet cleanup. As in poo. It cracks me up that people buy plastic bags specifically for this purpose. I don't think you need a link for this one either. If you do, you probably shouldn't have pets anyway. :D
Okay, so it's four uses. But it's four uses I've done in the past, they're four uses that are pretty easy, and uh... you should try them too.
Showing posts with label other crafts. Show all posts
Showing posts with label other crafts. Show all posts
Friday, October 1, 2010
Monday, September 27, 2010
Natural Dyestuffs that Don't Need a Mordant
Firstly, wts is a mordant? It's a powder, liquid, whatever, that helps the dye stick to whatever you're attempting to dye. Most natural fibers need something to help the dye stick. But some natural dyes don't need a mordant, so you can skip that step.
These dyestuffs can work well on their lonesome:
* walnut hulls and some seaweed turn something blackish (dark brownish and dark greenish)
* coffee grounds and avocado skins can give you a brown
* Red beets and saffron, if you want to waste your saffron on dye, can give you reds.
* Tumeric can give you nice yellow
* Blackberries can give you a blue color.
You can mix and match, get a purple hue with a detroit red beets and blackberry combo. Chop your stuff up, put it in a large pot, cover it with several inches of water. Soak the walnut hulls and avocado skins overnight. Anything more solid or tough than herbs, boil for about an hour. Herbs take about half that time.
After boiling, strain the solids out of your dyebath. Let it cool. Add just enough water so your fabric or yarn can move around freely. Boil the dye and your fabric or yarn for about an hour. Rinse, and carefully dry, and continue crafting.
Sometime in the future, I'm gonna test hopi red dye amaranth and see if we can do it sans mordant.
Tuesday, June 9, 2009
How To-sday, how to procrastinate
step one: be me.
i melted crayons down into other crayons recently. this is how i did it:
1. Collection. Get a bunch of crayons. It's best to have too many than too few, otherwise you'll end up combining colors that you weren't planning on combining.
2. a and b. you can sort then peel, or peel then sort. Peel the labels off all your crayons, and put the crayons in piles or small buckets by color. I had tons of black crayons, and yellow, blue, and red crayons left from my wedding. I separated all the colors.
3. Place roughly half a cereal bowl full of crayons in a cereal bowl. A microwavable cereal bowl. You can use any container that you don't mind having coated with melted crayon. Technically, you should use something reserved for crafting. However, being a reformed crayon eater, I can vouch for non-toxic crayons being non-toxic.
4. Microwave at 30 second intervals. Check every 30 seconds, stir a bit, and microwave until smooth and melted. If you want your new crayons oddly textured, you don't have to wait until all the little bits are melted, but it's a good idea. Also, my bowl wasn't labeled microwave safe, and did get quite hot. Use hot pads, and don't do this without adult supervision, or if you are horribly clumsy, or have cats and dogs running around and generally being trip hazards.
5. Once nice and melty, carefully spoon into the molds. What molds? Oh, that's right, I didn't have a supply list at the top. I used the molds that are made for chocolate. You can also use silicone molds, ice cube trays, margarine tubs. Basically, anything that can take the heat is doable. Remember, the larger the crayon, the longer it'll take the infernal thing to cool. Fill the mold to the top especially if you're using fairly shallow boom box molds like I did for the black crayons.
6. Let it cool and solidify about 5 minutes or so. Then stick it in the freezer. This cools 'em down the rest of the way, and because they shrink a bit more than the mold itself does in the cold, it's super easy to pop 'em out of the mold. Twenty minutes in the freezer is more than enough time. While you're waiting, you can get the next batch of crayons melted, if you want, but you might have to remelt them once your molds are free.
And for further info:
melting point of crayons
short tutorials on how to melt crayons and make new crayons
BakeItPretty, a source for superdope chocolate molds, from cameras to scissors to cute lambs
I leave you with the always lovely Billie Holiday.
Friday, January 30, 2009
Spring cleaning and rearranging, and a compass rose
Some things my mom left behind when she moved, and a postcard from my sister in law (thanks Tia:
My brother and I talked last night about old photos, and how your perspective on the picture, the people and the items whose images that appear, the stories surrounding those people - how these things change as the years go by.
Change things by time and location, and your perspective changes.
Every now and then I have to move things around. Change the flow and such. Decide if I need all this stuff. That's what I've been doing this week.
That, and this:
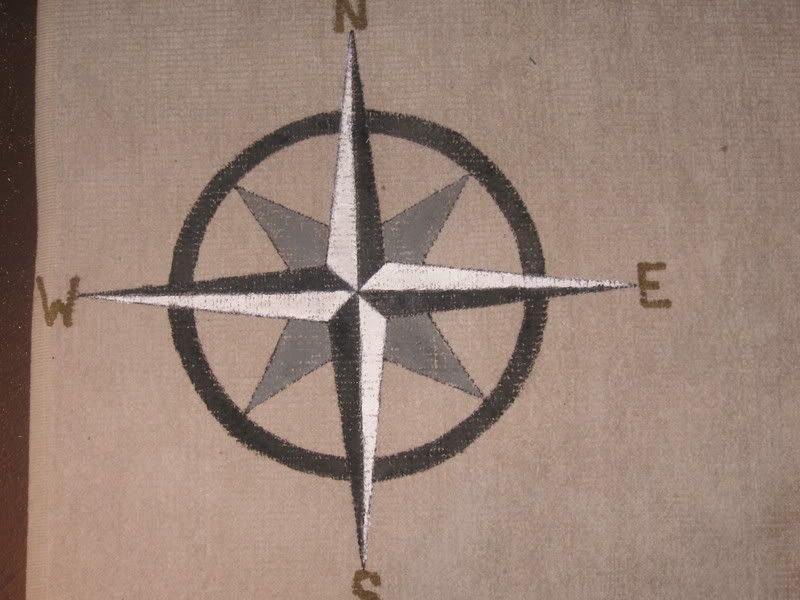
I painted that compass rose with a little help from this site. Well, really, a LOT of help. And I liked the black, white, and gold so much on the sixth picture on this slideshow that those are the colors I went with. Plus, the colors were BrownBear approved!
Thursday, January 8, 2009
I got it a thrift store ...
It was plain, rough wood. Begging to be painted. Begging to be turned into something. Then I stumbled on something that only a BRILLIANT aunt would think of: give the pointy stick thing to your nephew who might be in a stabby mood from time to time!
So:

Maybe he'll like the Raiders. Maybe he likes pirates. Maybe he likes pirate movies. Anyway, I hope he'll like this:

So:

Maybe he'll like the Raiders. Maybe he likes pirates. Maybe he likes pirate movies. Anyway, I hope he'll like this:

Thursday, January 1, 2009
New Year's Day Thursday Quickie
Some things are so hard to capture in photographs. My brother's brindle dog, for example. They tend to be even harder to capture with the bottom of the bottom of scanners on the market. Oh well. Here goes:
A journal (with a heavily textured cover that doesn't show up very well) I made for a friend:

and the back:

I actually painted this journal a while ago, then the paint started peeling off. So I peeled the rest off, sandpapered the cover, and started fresh!
A journal (with a heavily textured cover that doesn't show up very well) I made for a friend:

and the back:

I actually painted this journal a while ago, then the paint started peeling off. So I peeled the rest off, sandpapered the cover, and started fresh!
Monday, July 14, 2008
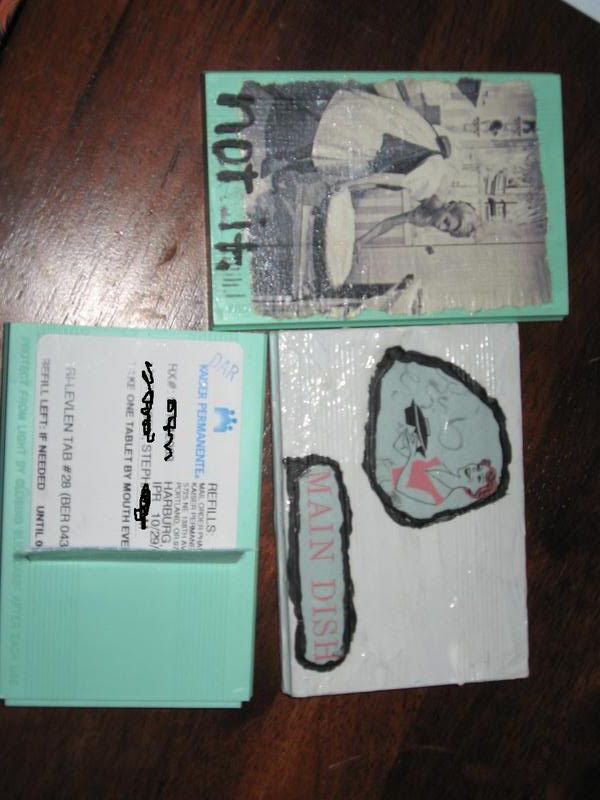
Old project : Birth Control Pill Case Revamp
I have a IUD now (the only hormones in my now are the ones I make myself, plus whatever's in the occasional meat I eat - gross), but this is what I did to my pills to make 'em a little more exciting Embellished with images from a magazine and an old cookbook, add a little acrylic paint and Mod Podge, and you've got a fancy feminist pill case. It made me a bit happier about taking the infernal pill once a night.
Subscribe to:
Posts (Atom)
