I've made tons of stuffed animals over the year, both with patterns and without. I've never been good about writing down patterns so I can replicate what I've done until now.
Enjoy!
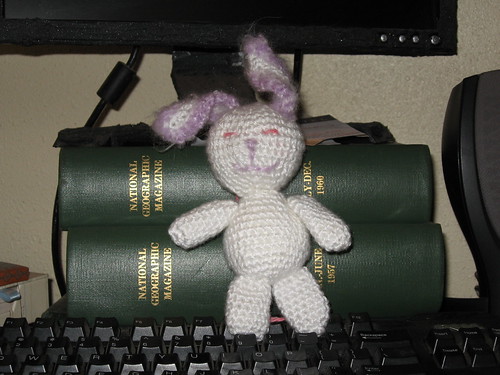
Year of the Rabbit Little Crochet Bunny
G hook
tapestry needle if desired
white Caron Simply Soft
small amount light purple fuzzy yarn like Paton's Divine
couple handfuls of stuffing
Head:
chain 2
row 1: 6 sc in first ch (6 sc)
(I use a modified "magic loop, use whatever method you like to make a pretty start)
row 2: 2sc in each sc around (12 sc)
row 3: (2 sc in next stitch, 1 sc in next st) repeat around - 18 st
row 4: (2 sc in next st, 1 sc in each of next 2 st) repeat around - 24 st
row 5: (2 sc in next st, 1 sc in each of next 3 st) repeat around - 30 st
row 6: (2 sc in next st, 1 sc in each of next 4 st) repeat around - 36 st
row 7-9: st around - 36 st
row 10: (sc next two stitches together, 1 sc in each of next 4) around - 30 st
row 11: (sc next two st together, 1 sc in each of next 3) around - 24 st
row 12: (sc next 2 st together, 1 sc in each of next 2) around - 18 st
Stuff for snugglability and character.
row 13: (Sc next 2 st together, 1 sc in each of next 1) around, 12 st
row 14: (sc next 2 st together) 6 st
break yarn leaving a long tail, weave through remaining stitches like a drawstring and close. Save tail for stitching head to body.
Body:
chain 2
row 1: 6 sc in first ch (6 sc)
row 2: 2sc in each sc around (12 sc)
row 3: (2 sc in next stitch, 1 sc in next st) repeat around - 18 st
row 4: (2 sc in next st, 1 sc in each of next 2 st) repeat around - 24 st
row 5: sc around
row 6: (2 sc in next st, 1 sc in each of next 3 st) repeat around - 30 st
row 7-11: sc around.
row 12: (sc next two st together, 1 sc in each of next 3) around - 24 st
row 13: sc around - 24 st
row 14: (sc next 2 st together, 1 sc in each of next 2) around - 18 st
Stuff body.
row 15: (Sc next 2 st together, 1 sc in each of next 1) around, 12 st
row 16: (sc next 2 st together) 6 st
break yarn leaving a long tail, weave through remaining stitches like a drawstring and close.
The head is the fatter of the two balls. Stitch the head to the body, or the body to the head - whichever phrasing you prefer. I like stitching the two ends together, so that the magic loop beginnings are at the very top and very bottom of the figure.
On with the bunny's other bits:
Ears:
make two
ch 11
sc 10, ch 1, turn
sc 9 back, in last sc stitch 3 sc.
Continue around, stitching down other side of chain for 10 more sc.
Change to fuzzy yarn, ch 1, turn, 10 sc in each of next sc, 2 sc in next 2 stitches, 10 sc down other side
Break yarn.
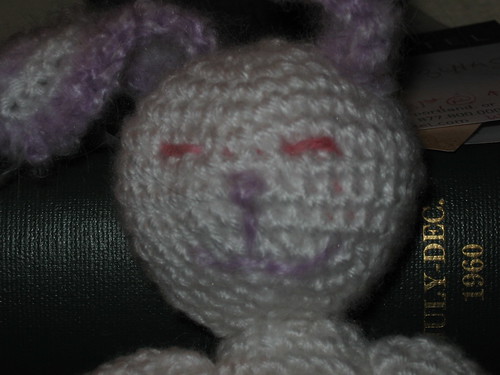
Stitch ears on head in between rows 3 and 4. They will be a little unruly, likely, which I think adds to this little guy's personality. With the fluffy yarn, or a contrasting color like black, stitch a little nose and mouth. For eyes, for a little one, I recommend stitching them with yarn. You can also add buttons or felt eyes. Be careful with buttons as you don't want babies or toddlers to swallow them. Actually, swallowing might be ok - what you don't want is for them to choke on the buttons.
Ok. Almost done.
Legs
Make two.
Ch 2.
Row 1: sc 6 in first ch.
row 2: 2 sc in each stitch around (12).
row 3-8 sc around.
Break yarn.
If desired, stuff legs. Otherwise sew them on to bottom of body roughly between rows 1 and 3. You can, before you sew them, run the tail through the ending stitches and pull the drawstring tight, then stitch them on. This allows an increased movement. This is how I attach my arms with smaller stuffed creatures. I usually stitch each leg's top closed so that it's flat, and then stitch the leg to the body. Hopefully you can see what I mean from the pictures. I did not stuff the limbs of this particular rabbit.
Arms:
Make two.
Ch 2.
Row 1: sc 6 in first ch.
Row 2: (sc 2 in next st, sc 1 in next 2 st) repeat 'til end) - 8 stitches
Row 3-8: sc even.
Break yarn and attach as described in leg portion above.
Oh yeah, this pattern is for personal use only. Make all the gifts you want. Please link to this post and give me credit if you post pics online. And please don't try to sell the pattern. If someone wants a copy of the pattern, just give it to them.

No comments:
Post a Comment